We often emphasize the importance of providing context for translators. The more context you provide, the better translation quality you can get. This is especially important when it comes to web or mobile applications. Since texts for app translation are typically short, context would help translators decide which translation variant should be used.
With Crowdin, you can provide translation context in multiple ways. It can either be a textual context for every key or an in-context preview to let translators browse the web app while translating. A manager in a Crowdin project can add screenshots, so translators can see exactly how the key would be used in the app. Let’s stop on the screenshots, they are great but might be hard to add for every key and maintain them relevant as your project evolves.
One of our customers – Bounce, recently implemented a great solution for managing project screenshots. The amount of screenshots they manage is huge! Bounce project has 8000 screenshots in Crowdin, covering a big part of their product – a mobile app for luggage storage and pickup and their email templates. These screenshots are being updated as the product evolves. No manual work, the whole process is automated. How can that be possible? Let’s figure it out.
The Story Behind It
Bounce is translating all the customer-facing content into 11 languages. This includes mobile apps, marketing content, landing pages, emails, and other notifications.
Their team started receiving a lot of feedback from translators that they needed more context. That’s why they wanted an efficient way to automatically provide that context by uploading hundreds of screenshots to Crowdin. Of course, no one wants to take screenshots and upload them manually. Even if the person responsible for uploading the screenshots did do it manually, they would need to be able to tag the correct translation keys, which could also be difficult and time-consuming.
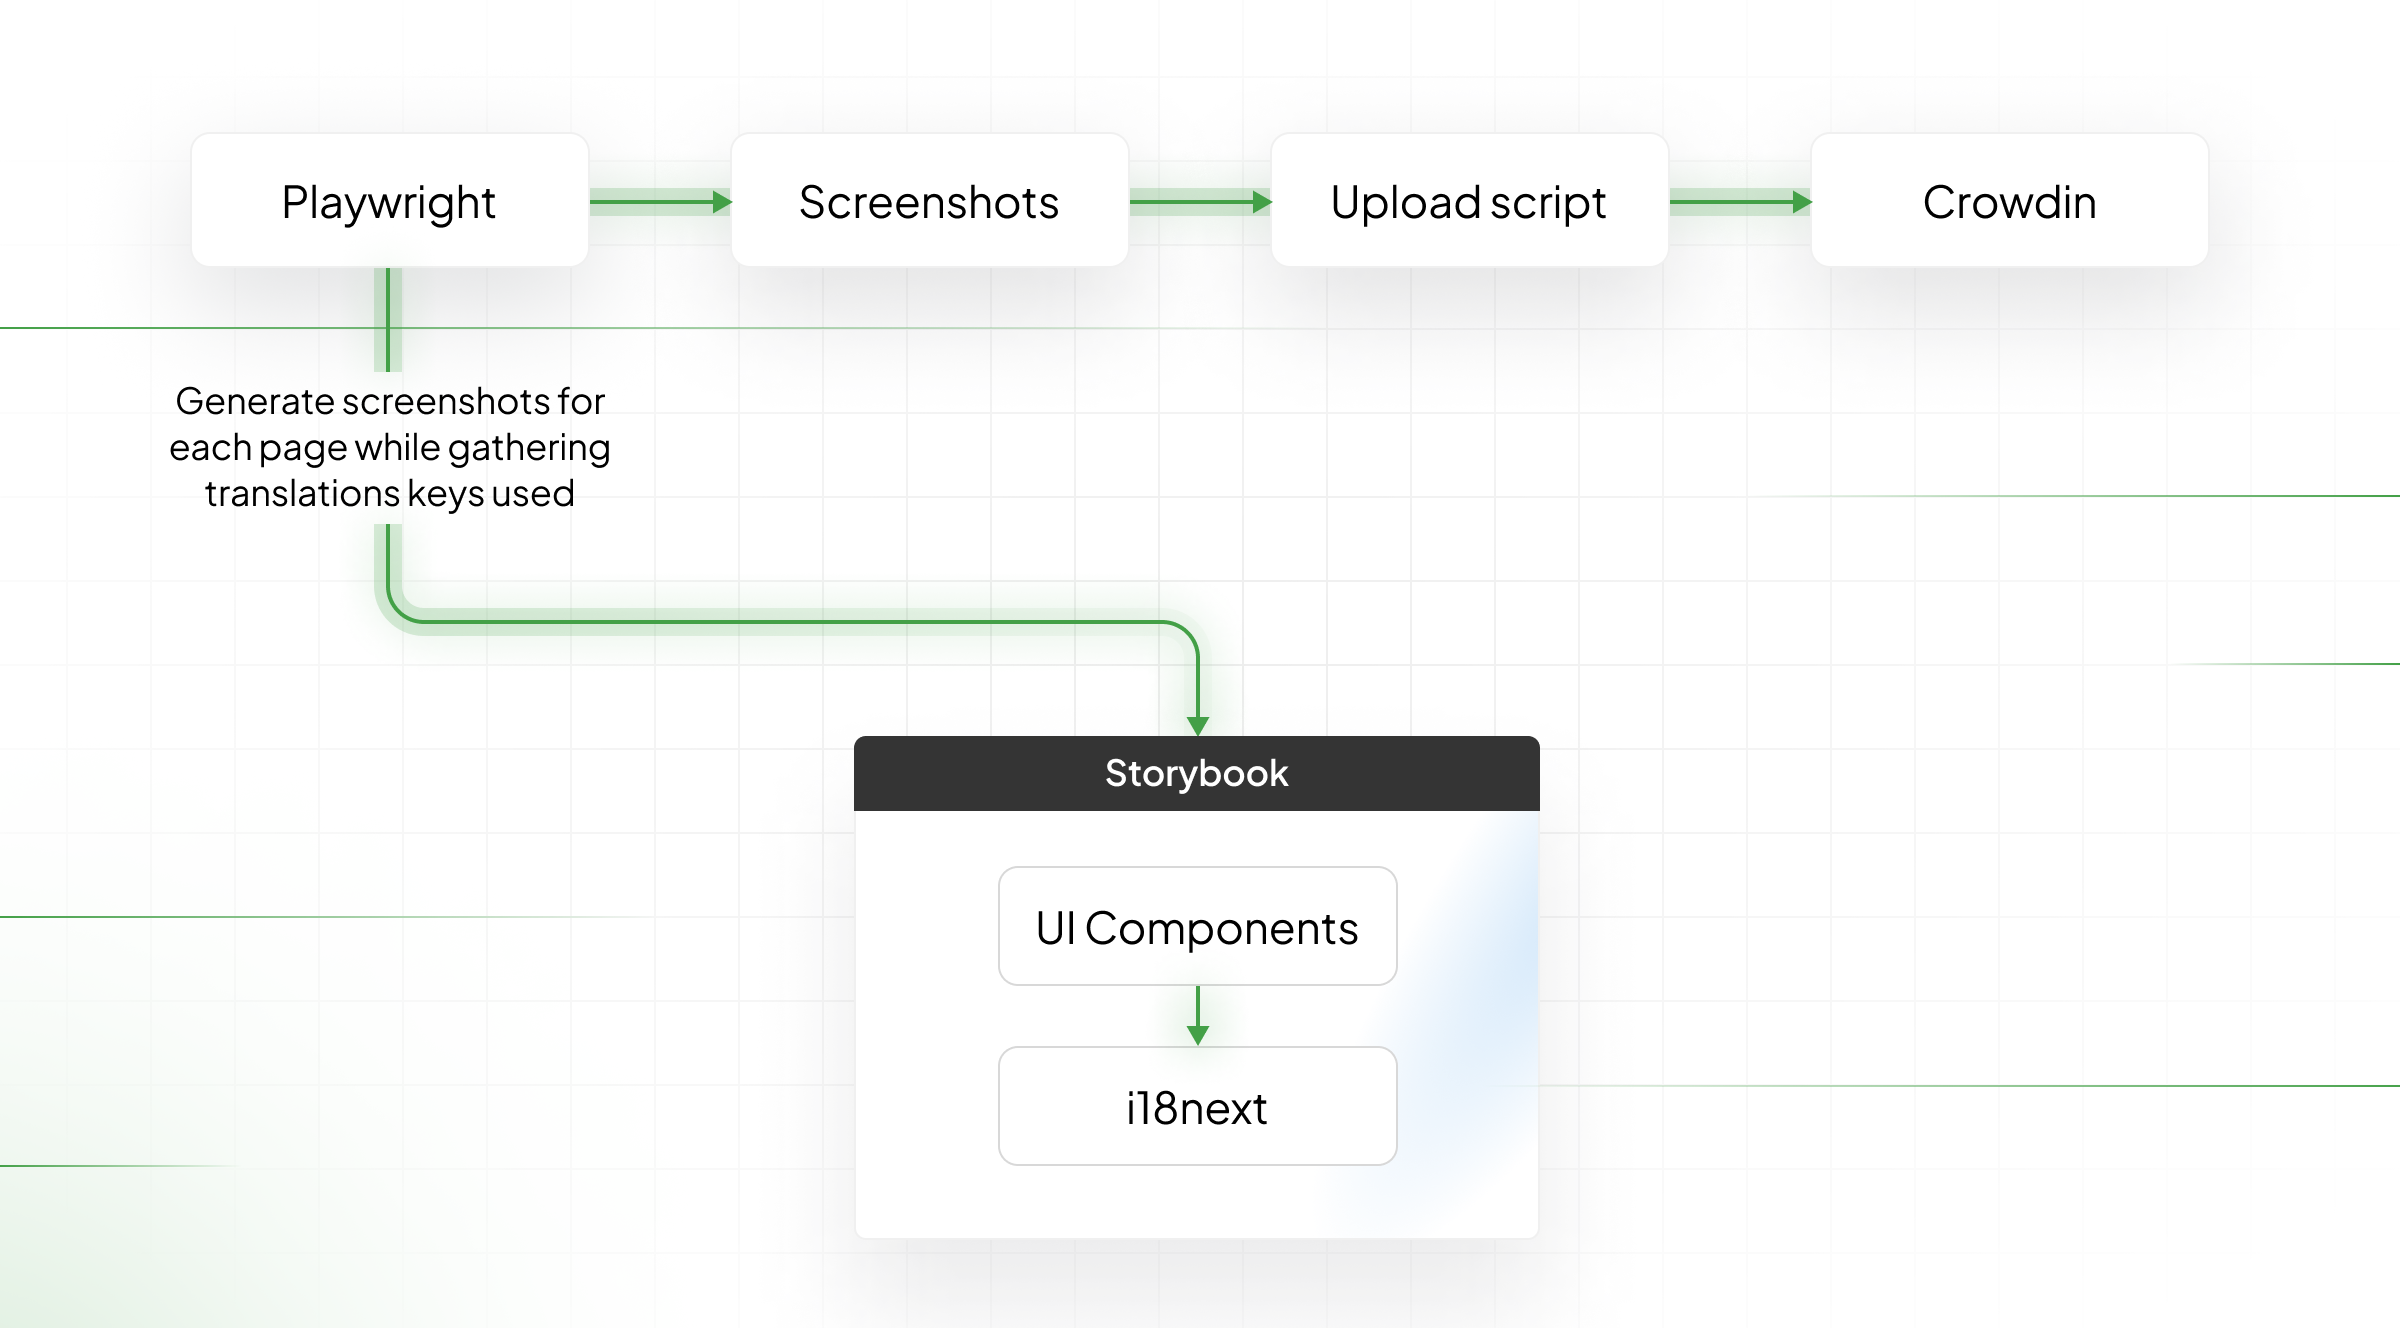
Their team uses Storybook, a tool for building UI components, which stores screens used in their product. It currently hosts over 8000 screenshots. So the Bounce team decided to create an integration that can automatically upload more than 8000 app screenshots to Crowdin, saving time for the team and providing translators with the context they need.
We jumped on a call with Ciaran and Daniel from Bounce to learn more about their unique solution and who else can use this in their projects.
A Quick Overview of The Solution
TLDR; After building Storybook, a customized i18n library would be instructed to “remember” which keys were used on every particular “component.” Then another script would do a screenshot, take keys from that screen, upload them to Crowdin, and tag these keys to the screenshot.
A quick note: Storybook is open-source software that can be used to build UI components and pages in isolation. This way, any component page in your application can be created and reused.
Many of you would say, “Oh, we do not use Storybook to the extent where most of the UI components are there.” That’s why we worked with Daniel, Ciaran, and Crowdin’s QA team to see if the concept invented by Bounce can be used with many other QA, where automated tests that go between the app’s screens would replace the need to use Storybook.
Technical Implementation and Prerequisites
Let’s get to our interview and discuss this integration in more detail.
What are the workflow “puzzles” that can be used or replaced if needed?
We use specific frameworks and libraries, but alternatives could work just fine. Here are just some examples:
- React → Vue.
- i18next → Probably any other translation library, as long as you can track when the translation function is called.
- Storybook → Histoire, or a real build of the app.
- Playwright → Any other E2E testing library.
How do you currently track the file changes?
Whenever we merge a pull request, we have a CI pipeline that checks which parts of the UI might have been affected by the changed files. It then retakes/re-uploads screenshots for those parts to ensure that translators in Crowdin always see the latest UI version where the text will appear.
What kind of content uses these screenshots?
The screenshots are only used for translation context. We take screenshots of UI components in isolation (e.g., an “Opening Hours” accordion component) and entire screens where those components appear (e.g., the Store Details page). That way, the translators will have an easier time finding the text in the individual UI component and can see how it fits in with the “bigger picture” of the screen.
What are the limitations of this solution?
Our solution isn’t perfect. Not every translation key will get a screenshot because we don’t have stories for every situation, e.g., error messages that only get shown after taking action, such as logging in with an incorrect verification code. We might also delete and re-upload screenshots “unnecessarily.” But it’s a good first step towards having a fully automated way of providing context.
How to find/use your scripts?
We’re considering finding a way to open-source the code/scripts we use, but it’ll probably take some time. Once it’s released, you’ll be able to find it on the Bounce’s GitHub page.
The Solution Walk-Through
At Bounce, we use React for our front-end apps. We use react-native and Expo for our web and mobile apps and Next.js for static pages. The framework isn’t important for this solution – any JS framework would work fine.
For handling translations in our apps, we use i18next. Whenever we want to translate something, we call the t function with the translation key (e.g., t(“screens.payment.addPaymentMethod”, “Add payment method”)). Again, the library we use here isn’t important – any translation library would probably also work for this.
We use Storybook heavily in our development process. It allows us to develop screens and components in isolation without running the app. We also deploy it so that designers and other stakeholders can see and give feedback on the UI we’re developing.
One feature of Storybook that really comes in handy here is being able to create stories for any different UI states we want. If you think of test coverage as how much of your code is covered by tests, we have a pretty high UI coverage by having stories for many different scenarios that appear in our apps.
To automate adding translation context, we needed to be able to:
- Open a page.
- Figure out which translation keys are being used.
- Take screenshots.
- Upload the screenshots to Crowdin, and tag the translation keys used in each screenshot.
Tracking translation keys
To track which translation keys are called in a story, we created a custom Storybook decorator. This decorator wraps our stories and ensures they all use the same instance of i18next.
import { DecoratorFn } from "@storybook/react"
import { useEffect, useMemo } from "react"
import { i18next, I18nextProvider, initReactI18next } from "../src"

// This is where we store the translations for each story, separated by file.
let storyTranslations: Record<string, string[] | undefined> = {}

/*
* This is a custom post-processor. i18next will call this every time
* we translate something
*/

const extractUsedKeys = {
  type: "postProcessor" as const,
  name: "extract-used-keys",
  process(
    value: string,
    translationKey: string,
    { ns: namespace }: { ns?: string },
  ) {
    if (!namespace) return

    // Add the translation keys separated by namespace/file name
    const nsKeys = storyTranslations[namespace] || []
    nsKeys.push(translationKey)

    storyTranslations[namespace] = nsKeys

    return value
  },
}

i18next
  .use(extractUsedKeys) // Add our custom post-processor here
  .use(initReactI18next)
  .init({
    defaultNS: "",
    postProcess: [extractUsedKeys.name], // Tell i18next to use the post-processor
    postProcessPassResolved: false,
  })

export const WithI18next: DecoratorFn = (storyFn, context) => {
  const {
    id,
    parameters: { customParams = {} },
  } = context

  /**
  * After rendering the story, wait for a little bit before setting the translations
  * on the window. We can increase the delay in each of the stories if we want
  * to wait longer, e.g. for animations to finish.
  */
  const delay: number = customParams.delay ?? 50

  useEffect(() => {
    const timeout = setTimeout(() => {
      Object.assign(window, { storyTranslations })
    }, delay)

    return () => {
      clearTimeout(timeout)
    }
  }, [delay])

  return <I18nextProvider i18n={i18next}>{storyFn()}</I18nextProvider>
}
When Playwright visits one of our stories, the decorator sets a storyTranslations variable on the window, containing all the translation keys used in that story. The keys are grouped by file name to make it easier to upload them later. The result looks something like this:
{
  customer: [
    "cmp.durationField.label.checkIn",
    "cmp.durationField.label.checkOut",
    "cmp.durationField.open"
  ]
}
Programmatically visiting stories and taking screenshots
To be able to upload screenshots of all of our stories, we first need to know how to find those stories. Luckily, Storybook produces a stories.json file when you create a production build, and it essentially works like a sitemap. It gives us the ID of each story, which we then use to create the URL we need to visit that story (iframe.html?id=the-story-id).
Next, we need to be able to programmatically visit each of those URLs in the browser. Playwright is intended for writing end-to-end tests, but it works perfectly for this. We can instruct it to:
- Visit a URL (in this case, a story).
- Wait for the storyTranslations object to appear on the window.
- Read that value, and save the translations in a JSON file.
- Take a screenshot.
We can even tell it to do it for different browser sizes, which is important because some translations only appear at certain screen sizes.
In the end, we end up with a folder structure like this:
.
└── translations-context/
└── [story-id]/
├── desktop/
│ ├── translations.json
│ └── screenshot.png
└── mobile/
├── translations.json
└── screenshot.png
We now have everything we need to start uploading screenshots to Crowdin and tagging them with the correct translation keys!
Uploading the screenshots to Crowdin
In our case, we created a Node.js script and used the Crowdin SDK for interacting with the API. The script goes through the folder structure outlined above and does the following for each story ID, screen size and translation file/namespace mentioned in the translations.json file:
- Delete any existing screenshots stored for the current story ID, screen size and translation namespace.
- Fetch information from Crowdin about the translation file and the strings in them. Here are the API methods: Get project files Get project strings
- Filter the strings information from Crowdin to include only the strings that appear in the screenshot.
- Upload the screenshot using a fixed naming convention. In our case, auto__[story-id][screen-size][translation-namespace].png. API methods: Add Storage and Add Screenshot
- Tag the screenshot with the IDs of the strings that appear in it API method: Add Tag
Context Improves the Translation Quality
Context empowers translators to make informed decisions about the most appropriate translations, considering the user interface, cultural context, grammar, technical terminology, and consistency. By prioritizing context in web and mobile app translation, developers and localization teams can ensure high-quality translations that resonate with their global user base and contribute to a positive user experience.
About Bounce
Bounce is the largest luggage storage network in the world, with more than 10,000 locations in 2,000+ cities worldwide, including London, Paris, Lisbon, Barcelona, NYC, Seoul, and Sydney. By partnering with local businesses around the world, Bounce empowers people to be free to explore wherever they are. Through the Bounce app or website, customers can find and book luggage storage in minutes, drop off their bags, and enjoy their day hands-free.
